Showing posts with label Tutorial. Show all posts

Wednesday, January 30, 2008

Heart" 3x3-notebox with lid

This weeks Challange at Papertake is "Hearts Desire". So your creation has to have a heart on it. This is what i made. The little box has hearts on the patterend paper, so i hope it is okay for the challange and for the 3x3 notecards i used my Cuttlebug Die and punched first the chipboard out and than the Designer Paper. I wanted the notecard not too fancy so i only added a prima flower to the heart. For stamping i used "Carte Postale" (words and the little flower branch). I hope you like my "non-cute" :-) work, too. Thanks for looking, today

just noticed on Frans blog, it works for the Stampin up Challange as well. Here you go:


I was not able to make pictures from each step on how to make the box but here are the instructions i have found online and i was able to finish my box with. Instructions
1) For the base of the box cut a sheet of cardstock to 5 3/8″ x 8″ and score along the short side at 1″. Flip the cardstock 180 degrees, then score on the other end at 1″.
2) flip cardstock 90 degrees, then score along the long side at 3 1/4″. Rotate 180 degrees, then score the other end at 3 1/4″.
3) Fold along the score lines, using a bone folder to help achieve a crisp, clean edge. Then cut along the 3 1/4″ score lines just until you reach the 1″ score line as shown in the picture below.
4) Place a small strip of double sided tape or sticky strip along the outside top edge of the small flap. Keeping your box bottom flat on the table, fold up one side of the box. Place a strip of double sided tape or sticky strip along the edge (on the inside) of each of the long flaps.
5) Again keeping your box bottom flat, fold up the other side of the box. box flaps do not overlap completely

6) For the lid, cut a sheet of cardstock to 4 - 3/8″ x 2 - 9/16″. Score at 1/2″.
7 ) Score at 1/2″ along the remaining 3 sides.
8) Fold along the score lines, again using a bone folder to get a crisp, clean edge. Cut on the score lines along the short side of the cardstock, just until you reach the intersecting score line
9 ) Fold the smaller flaps to the inside and tape to the side flap as shown below. Repeat on the other side.
finished

Friday, January 25, 2008

Reverse Scallops

Hello, sorry it took me so long to put up the tutorial on how to make the reverse scallops but i accedently deleted some of my pictures and i had to start all over again.
So here is what you will need / to do:

Hint: it is the best to start the first cut somehere in the middle of your piece of cs (eyeballing) - then punch to one side and go back and finish the other side. Especially if your piece is already correctly trimmed to the right size that you will need. If you do start from left to right you can end up with a not so nice last end cut.

Monday, January 21, 2008

Nip and Tuck Card

Today i would like to show you a cute litte "Nip and Tuck" Card. I love this style, infact i made 3 today :-) once you made one - it is really fast and so much fun. Here are the step-by-step instructions how to fold and pictures too.
cut your piece of designer paper down to 11x11. If you have double sided paper you want to put the side you like to show face down.
fold in half like shown and score from tip measuring at 3" and 5 1/2" on both sides
turn and score the point on 3.5" (making sure it is straight)
now you cut the little triangles out you have created with your score lines.
than push the little squares on each side like this (picture) to create pockets. Do this on both sides.
now you can glue some of the paper together. i did the triangle top and i completely shut one sqare (the one on the right side) and just added a tiny little pice of double sided tape into the bottom of the left square.
this is how you are going to close the card:

tuck the top into the square which is not completely closed and it will hold the card shut.
Voila! All done and ready to decorate.

Saturday, January 19, 2008

Recipe box and matching notecard

I prepared yesterday the tutorial for the notecard box and i saw my new Designer Paper sitting there so one came to the other and thats the outcome:
This cute little Magnolia/Tilda image is just perfect for that box. I cut her out and layered the entire piece onto "Pretty in Pink" CS and cut that out again. This way she stands out more, against the patterend background of the box. Adhere just her upper bodypart to the flap of the box.
The file cards use Stampin up's Stamp of Autencity and Tabs Stampset. The cards to write the recipe on are quite small so i added to the back and the front the paper thats lined so you can write on both sides.
Here is how the inside looks like:
and from a piece of leftover Designer Paper i made a matching notecard to go with the box
European Measurements approx:
lange seite: 5cm, 14cm, 19cm, 28 cm kurze seite: 4cm, 9 cm, 18 cm

Box Instructions

Here are finally the instructions how to make the little box:
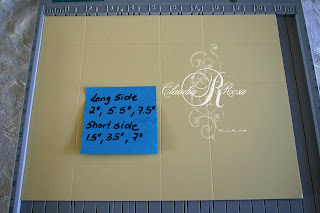
It uses a full 8.5x11 sheet of paper with the following score lines:
Long Side: Score @ 2", 5.5", 7.5", 11"
Short Side: Score @ 1.5", 3.5", 7" -
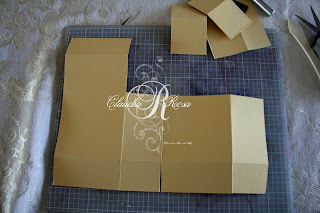
Took pics for step by step how to cut and glue. I hope this make sense.


Thursday, January 17, 2008

Box und Notecards

Diese Box hatte ich vor Weihnachten angefangen und einfach nicht fertig bekommen. Heute endlich ist es mir einfach gefallen sie fertig zu stellen. In den naechsten 2 Tagen poste ich eine kurze Anleitung dafuer. Heut' reichts leider zeitlich nicht mehr und morgen muss ich an meiner Magnolia Challange Karte arbeiten. Die kleinen Kaertchen sind 3x3.

Finally i was able to finish today this little box for 3x3 Notecards. I started it before Christmas and i was somehow stuck. Today it went so easy to finsh them. The note cards are 3x3. in the next couple of days i will post instructions for it, today iam a bit in a hurry and tomorrow i have to work on my Magnolia Challange project. Stampset: Stampin up: Carte Postale, Innen: Simply Said (nicht zu sehen)
CS: SU Black, Pretty in Pink, White, DP last years SU Valentines Line
Embellishments: Silver Brads, Pretty in Pink Ribbon
Tools: Quick-Kutz Heart Die, Stampin up Circle Punch
Ink: Chocolate Chip

Wednesday, January 16, 2008

Strawberry cake - hmmm yummy

I visited Dawn 's blog the other day and noticed there that she is a Design Team Member for
papertakeweekly. So i go and check this site out and what must i say - i love it!!! Than was hopping over to Sandys blog and i noticed her link for the artysgirlschallangeblog. They have a challange posted were i could combine the two challanges in one card. so here is the outcome:
I have a aunt who lives since she was 18 years old in Texas and she still misses German cakes. So i made her this card with a Strawberry cake recipie i like. On the inner left side is the recipie adhered and on the middle part is still enough space to leave a personal note. Now the cool thing about this style card is, that it is perforated. So she can take the recipie part off the entire card and keep it in her recipie box without having all the bulk of the rest of the card.

Meine Tante wohnt nun schon seit sie 18 Jahre alt ist in Texas und sie vermisst immer noch die gute Deutsche Baeckerei. Viele von diesen Backzutaten sind sehr schwer in den USA zu erhalten. Wir tauschen seit langem Rezepte aus. Sie schickt mir welche von ihren orginal mexikanischen Rezepten und ich meine Lieblingssachen. Das tolle an dieser Karte ist, dass der Vordereteil leicht abzutrennen ist. Ich habe die Faltung mit einem Perforationstool durchstochen und wenn sie die Karte glesen hat, kann sie einfach den Vorderteil abtrennen und in ihre Rezeptebox reinlegen ohne die ganze Karte aufheben zu muessen.To perforate the front - so you can take it easy off - i used this nifty tool (shown in the pic) from EK Success.
Zutaten:
CS: White, Cool Carr. Real Red, DP, Black
Tools: Cuttlebug, EK perforator, Stampin up Tab Punch, Nestabilities
Stamp: Ellen Hutson Stawberry image recieved through RAK

This is an other card i made last year, same system using a set from Stampin up.
Card Instructions:
11 x 4.25
scored at 1.5 on one end and perforated on the other side at 4 inch

Tuesday, January 15, 2008

The 3.B's - Big Buckle Birthday (Tutorial)

Ich habe eine Geburtstagskarte fuer eine Freundin gebraucht, deshalb habe ich meine neue Tilda eingeweiht. Designer Papier ist von der Making Memories Noteworthy Collection und das kleine Rosenknoepfchen passend dazu auch.

I needed a birthday card for a friend of mine well... her birthday is on the 29. but i was dyeing to finally use my new Tilda with birthday cake :-)
If you have never made a big buckle card here are the measurements:

Supply List:
Card Base is : 5”x 8.5”, scored at 5” (here Chocolate Chip)
Inside Card Paper: 4.75” square (here Cool Carr.)
Buckle: 1.5”x 4” (here Chocolate Chip and layerd with DP)
Other paper to layer (here Noteworthy)
Tools: Word Window PunchSU! Corner Rounder PunchSU! (i used it to round the buckle that part thats tucked inside the WW-Slot), Round Punches (optional), Embellishments (optional)

This is the big buckle card i made for my sons 4. Birthday. We had a pirate themed party. This card is colored with Prismacolor pencils and some sponging on all layers. On the ocean i used sparingly (we are talking boy card ;-) blue glitter. Stamps used: Stampin up: Cheesecloth, Ahoy Matey, Mateys Map Wheel.
This is a big buckle card i made last year for eastern. Image is from Penny Black. On the flowers is glitter - its a bad picture you can barely see anything. I colored the entiere image with prismacolor pencils.

Saturday, January 12, 2008

Nestabilities Tips - Tutorial - Scalloped Notecards

Ich moechte euch heute gerne zeigen wie ihr mit den total angesagten Nestabilities und eurer Cuttlebug diese kleinen scalloped Notecards machen koennt.

Ich habe fuer diese Kaertchen das Nestabilitie Set: Rechteck Large und Quadrat Large benutzt.
Die Nestabilities sind mittlerweile in gut sortierten online Geschaeftenerhaeltlich. Meist sind sie aber so schnell ausverkauft wie Lagerbestand aktualisiert wird. Deshalb gilt es oft nachzuschauen. Ich habe meine Nestabilities bei EllenHutson gekauft aber ich habe gehoert, dass sie bei AllThatScraps auch erhaeltlich sind. Ich war sehr zufrieden mit Ellens Service.... schnelle Lieferung und handschriftliche kleine Notiz mit einem "Danke-Schoen" wo bekommt man das noch?
Today i would like to show you how you can make nice small scalloped Notecards with your Nestabilities Dies. These dies are availabe in most of the better online stores like Ellen Hutson or at AllThatScraps. Unfortunately these Dies are so popular right now in the US that they are sold out as fast as they get in. So if you really want some you have to check these stores regulary. For these cards i used my large set of rectangles and large square set.
Ok.. jetzt zum Arbeitsablauf...
Ich habe ein etwas grosses Stueck CS genommen und schon gefaltet. Das groesste Nestabilitie so angelegt. (bedenkt... CS liegt doppelt!!) und durch meine Cuttlebug gedreht. Reihenfolge wie die Platten zu stapeln sind habe ich am Ende dieser Post eingefuegt.

i folded my piece of cs in half and aligned my die as pictured on the photo. remember this die will cut through two layers of cs without problem. you might have to go over it twice but it will work.
Als naechstes habe ich die meine SugarNellie die ich heute morgen im Briefkasten von Tammi
liegen hatte ausgeschnitten. Damit sich das Die nicht verschiebt habe ich den Metallstueck vorsichtig mit doppelseitigem Klebeband ausserhalb von meinem Motiv befestigt. Denkt daran es ist wichtig, jetzt beim Ausschneide-Prozess das ganze Bild umzudrehen - sprich das ihr seht das Motiv nicht. Wenn ihr das nicht macht, koennt ihr die Nestabilities beschaedigen.
Next i used my new SugarNellie image i got from Tammi. What cute surprise this morning in my mailbox. I used two pieces of double sided tape to hold my die in place while iam cutting the image out. Making sure that the tape is not adhered to the inside part of my image. Than i flip that sandwich over to cut out. Never run the Nestabilitie or Cuttlebug die like pictured (face down) through your machine you can damage your die.
So sieht es aus wenn das Motiv ausgeschnitten worden ist. Jetzt moechte ich es noch mit einem kleinen Rahmen embossen. Ich lasse das Papier so in meinem Die und bewege es vorsichtig auf die entsprechende Cuttlebug Platte damit es nicht aus dem Nestabilitie Die rausfaellt.
This is how it looks like once its cut out. Now i wanted to emboss my SugarNellie. I left the paper inside the Die and moved it carefully to the right Cuttlebug plate to emboss. Stacking infos are posted below this tutorial. Wichtig beim embossing ist die Gummi-Matte:
to emboss you will need the Spellbinder Polymer Embossing Pad. I noticed too late that AllthatScraps has the best price on them. Cause you can buy only one Pad - i bought at Ellen Hutson and she sells only in a set of 2. Well .. it was okay for me, service at Ellen Hutson online store was exeptional good.
So sieht es aus nach dem embossing:
Thats how it looks after you embossed. You can see the front on my finished Notecard.
Nun zur Aufbewahrung von den Nestabilities. Wenn sie geliefert werden, sind sie in einem ziemlich duennen Plastikumschlag drin, der nicht viel aushaelt wenn man die Dies oft raus und rein schiebt. Deshalb habe ich eine alte CD Huelle genommen, doppelseitiges Klebeband im Kreuz aufgeklebt und so bleiben meine Dies schoen sicher augehoben und ich habe immer einen Ueberblick ob eines vielleicht fehlt.
Here is a picture how i store my Nestabilities. It works for me very well... i have every die save hold in place with double sided tape and i can see when i clean up my stuff if one is missing or not.
Cuttlebug™CapabilitiesWith the Cuttlebug
You can both cut and emboss Spellbinders Embossing Dies.
How-To Cut or Cutting Sandwich - (Stack from bottom up)
1. A plate
2. C plate
3. Spellbinders die face up (rough side up)
4. Paper or cardstock
5. B plateRun through Cuttlebug machine.
Embossing Spellbinders Dies in the Cuttlebug- (Stack from bottom up)
1. A plate
2. B plate
3. Die face up (with die cut still in die)
4. 3 pieces of cardstock
5. 1 Spellbinders tan polymer mat
6. 2nd B plateRun through Cuttlebug machine

Monday, January 7, 2008

Tutorial - Medallion

Hi, i recieved so many emails on my medallion i made on my Tilda card, so i thought i would share on how i mad it.
I will show you only how to make the medallion, please come back later this week so see a project i will include this handmade embellishment.

Tools used:
Stampin up! Scallop Punch, 2 Sizes Circle Punches and Carte Postale Stampset, Rhinestone Brad
first... get yourself organized hahahahahahaha.... thank choose your colors on cs. Since my medallion will be used for a Valentines-Project i decided to use Soft Sky, Pretty in Pink and Chocolate Chip. I love these colors and i know even if i end up not using the medallion on my project i have in mind, i can use it on something different.
Punch 3 scallops out of your cs.
Define your layers. I new my main project will be pink so my lowest level of my Medallion is chocolate to stand out more against the lighter color. than i went with pink and blue (layered in this order) insert one of the scallopes back in your punch and move it arround like this:
and punch again. A piercing tool is helpful to move it to the right position.
Here are 2 different kinds. i liked the one with every other scallop different cut the best.
now on top of all the scalloped layers i cut one more circle shape out in darker cs and than i punched an other circle out with my saying (Tilda card) or with any other stamped image. Your possibilities are endless. try stampin a flower, cut it out and adhere over your layers.
it looks very nice too.
hope this helps
thank you