
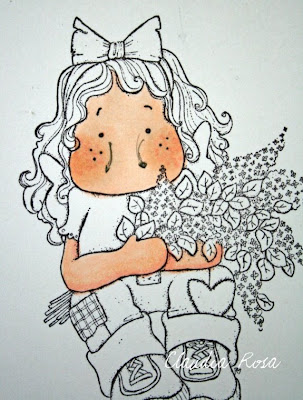
Hier auf dem Foto sehen Sie Copic Sketch Marker in den Farben E00 SkinWhite, E000 Pale Fruit Pink, 0 und R20 Blush (E01Flamingo Pink - ich benutze diese Farbe wenn ich 2 Figuren im Hauptmotiv habe. Z.b. Edwin in E01 und Tilda E00 das ergibt einen natuerlichen Kontrast)
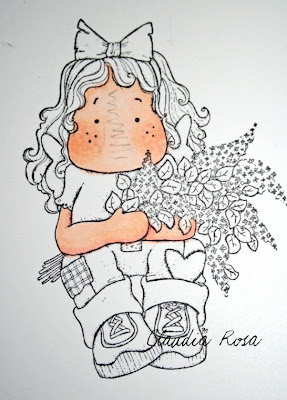
R20 ist eine sehr schoene Farbe die man nicht nur fuer die Wangen benutzen kann - in meiner
heutigen Karte habe ich den Pullover damit ausgemalt.
On this picture you can see Copic Sketch Markers in E00 SkinWhite, E000 Pale Fruit Pink, 0 und R20 Blush and also E01 Flamingo Pink. I do use Flamingo Pink usually if i have 2 people in my image to make them look different not only with clothes also with skin tones R20 is a very pretty color and can not only be used to give people rosy cheecks. On my card i used this color on Tildas sweater.
 Das Motiv muss mit einem Stempelkissen gestempelt werden welches man mit alkoholbasierten Stiften benutzen kann. Ich empfehle Memento Ink (ich moechte auf dieses Posting mit generellen Basis Informationen hinweisen - STAZON funktioniert nicht - sie werden die Pinselspitze ihres Markers ruinieren)
In order to be able to color with Copic Markers you will need a certain inkpad for that. I do reccomend Memento Ink. If you have missed this posting - you might want to read this for some basic information. You can NOT use STAZON to stamp your image.
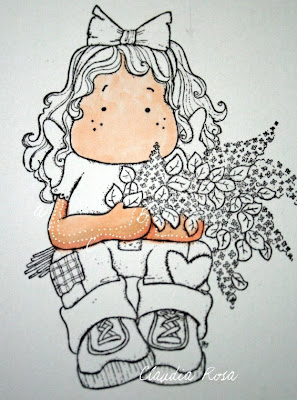
Grundsaetzlich ist noch zu wissen das sich die Copic farben veraendern je nachdem wie oft man mit dem gleichen Marker ueber eine Stelle Farbe auftraegt. Sprich.. ich kann bestimmte Stellen dunkler machen mit dem gleichen Stift. Ich fange mit dem Gesicht mit Marker E00 an. Hier trage ich die erste Farbauftragung vom Haaransatz nach unten auf und male das Gesicht grossflaechig aus. In diesem Schritt lege ich noch keinen Wert darauf ob alles gleichmaessig ausgemalt ist. Ich versuche zu vermeiden, zu oft ueber eine gleiche Stelle mit der Pinselspitze zu malen.
Okay lets get started. I take my E00 marker and start to color in from the hairline down. I do not pay too much attention at this point how evenly the color is in the area however you don't want to color too often over a certain area because you will darken your image on those spots. Keep this in mind because you can use EVERY marker also on purpose for this matter. If you just start with Copics you don't need all the darker colors - i did not start like that. Simply add several layers of one color over each other and you can also archive shadows.
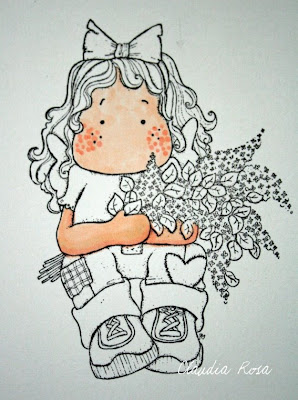
 Danach coloriere ich die Arme. Wenn Sie genau schauen dann sehen Sie am obern Teil des Arms die dunkle linie die bis zum Daumen laeuft. Ueber diese bin ich mit dem Stift 2. mal ueber die gleiche Stelle gefahren. Auch das Gesicht ist noch sehr unebenmaessig und fleckig.
Next i will color the rest of the body parts in. As you can tell - the face's skin color is unevenly. You can also clearly see a darker area on the top of the left arm along to the thumb. This is a spot where i added 2 layers of E00.
 Jetzt moechte ich Schatten und Dimension zu meinem Motiv geben. Ich benutze dafuer R20 und trage eine duenne Linie mit der Pinselspitze unterhalb des Armes auf oder ueberall wo natuerlicherweise Schatten liegen wuerden. Es ist wichtig, wirklich keinen Druck auf die Spitze zu geben damit die Linie recht duenn und gleichmaessig bleibt.
Next you want to add add shadows to the places they would naturally be - like at the bottom part of the arms. I use for that R20 and draw with almost no pressure to the marker a thin line along the bottom of the girls arm.

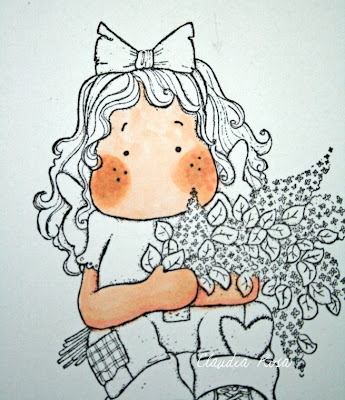
 Nun zum Gesichtchen der suessen Tilda. Ich nehme R20 und tupfe vorsichtig die Farbe an die Stellen die ich rosig haben will. Normalerweise sind meine Tuepfchen enger zusammen - ich habe es nur etwas uebertrieben weit auseinander fuer das Tutorial aufgemalt. Wenn ich an diesem Punkt mit meiner coloration bin, arbeite ich recht zuegig. Ich moechte vermeiden, dass die R20 Farbe zu schnell trocknet.

In den naechsten Schritten zeige ich wie man die Copic Farben blenden kann. Ich nehme wieder meinen Copic E00 Stift und verreibe nun die R20 Farbe (markiert mit "c") mit der Pinselspitze bis ca. zur Mitte des Armes (line B). Auf diesem Bild habe ich mit meinem Fotoeditingprogramm kleine Punkte als Anhaltsmarkierung eingezeichnet. Ich belasse die obere Haelfte des Armes mit nure einer Schicht E00 Farbauftragung. Wenn Sie sich das Foto in vergroessert ansehen, koennen sie erkennen, dass der Teil des Armes bezeichnet mit "B" einen graeulichen Unterton hat. Sie werden das vermutlich schon aus eigen Versuchen festgestellt haben - bitte nicht extra mit Farbe drueber gehen und versuchen das "grau" zu uebermalen. Der graue Unterton verschwindet sobald sich der Alkohol vom Papier verdunstet hat. Sie koennen nun mit ihrem Blender Pen 0 noch einige Stellen hier und da etwas auflichten wenn Sie moechten. Ich habe dies seitlich am Arm gemacht - die Stelle ist mit "a" markiert.
To blend this colored line I use E00 and "rub" R20 (part C) color with the tip of my marker but only until about the middle of the arm (part b). The top part of the arm i leave with just one layer of ink untouched. You are going to see some greyish discoloration to your paper. At first you might be tempted to add more ink to it - but just let it sit for a minute and the alkohol will vaprotise and you can see your wonderfully blended result. You can always use E000 to blend some more. If you like you can now add some more light to the top part of the arm by using your blender pen. I have don that on the side to the arm marked with the letter "a". If you feel like your arm is still a little blotchy you can "streak" with your blender pen once fast over those areas. Be careful and don't rub - just lift the color out.
 Nun zum Gesichtchen der suessen Tilda. Ich nehme R20 und tupfe vorsichtig die Farbe an die Stellen die ich rosig haben will. Normalerweise sind meine Tuepfchen enger zusammen - ich habe es nur etwas uebertrieben weit auseinander fuer das Tutorial aufgemalt. Wenn ich an diesem Punkt mit meiner coloration bin, arbeite ich recht zuegig. Ich moechte vermeiden, dass die R20 Farbe zu schnell trocknet.
Now to Tildas cute little face. I pick up R20 again and carefully dot some color to the cheeks. Usually i have them sit closer togehter but i was not sure if it would show otherwise on my picture thats why they are far apart. Once on that point of my coloring i work farily fast - i like to avoid that the color R 20 dries too fast. I dont really know if it would make a big difference :-) it is just the way i do it.
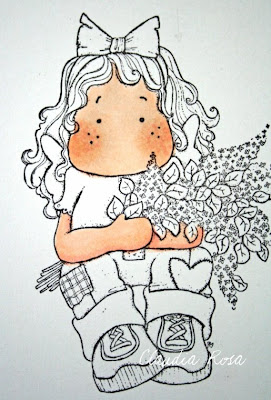
 Ich nehme wieder meinen E00 Stift zur Hand und verreibe mit der Pinselspitze in kreisenden Bewegungen die R20 Farbe hoch zu den Wangenknochen und zur Mitte des Gesichts. Sie koennen hier ruhig "etwas" Druck auf die Pinselspitze geben. Bitte denken Sie daran - je oefter sie darueber reiben - desto mehr E00 Farbe tragen Sie auf und verdunkeln die Flaeche.
 Ich nehme wieder meinen E00 Stift zur Hand und verreibe mit der Pinselspitze in kreisenden Bewegungen die R20 Farbe hoch zu den Wangenknochen und zur Mitte des Gesichts. Sie koennen hier ruhig "etwas" Druck auf die Pinselspitze geben. Bitte denken Sie daran - je oefter sie darueber reiben - desto mehr E00 Farbe tragen Sie auf und verdunkeln die Flaeche.
I pick up E00 and rub with the brush in circular motions the R20 color up to the cheeckbones and towards the middle of the face. You really can use a little pressure by doing that. Dont be scared :-) Please keep in min tho.. you are using color and the more you go over an area the darker it will get.
 Ich habe hier mit einem Bleistift die Stellen markiert die ueblicherweise nach dem Prozess in grau erscheinen. Diese verschwinden aber nach einer Weile. Lieber 5 minuten warten und dann nochmals mit E000 Unebenheiten ausgleichen.
Alle Unebenheiten gleiche ich nun mit E000 aus. Ich gehe wirklich grosszuegig ueber das ganze Gesicht und trage die Farbe auf und "verreibe" mit der Pinselspitze die Uebergaenge an den Wangen.
The basic skin tone is still very uneven. I use now E000 to smoothen the skin and make it look even and smooth. I work generously with this color all over the face only in one direction and maybe again on the arms to even out the colors.
Ich habe hier mit einem Bleistift die Stellen markiert die ueblicherweise nach dem Prozess in grau erscheinen. Diese verschwinden aber nach einer Weile. Lieber 5 minuten warten und dann nochmals mit E000 Unebenheiten ausgleichen.
On this picture i want to show you the areas that usually when i color the cheeks appear in some sort of grey tone. Those will fade after a while. Wait a few minutes and if you are not happy with the result - do "rub/belend" with E000 again over the area that needs to be fixed.
 Schatten entlang des Haaransatzes lege ich mit einer 2. Schicht Eoo auf. Mir persoenlich gefaellt es nicht mit einer 4 dunkleren Farbe im Gesicht zu malen. Es wirkt meiner Meinung nach unnatuerlich. (Geld gespart fuer eine andere Farbe, weil man wirklich nur 3 Stifte benoetigt)
 Mit E000 die Uebergaenge nochmals leicht ausgleichen. use E000 to blend the color in.
 Letzter Schritt... Mit der Spitze des Blender pen schnell und zuegig zwischen Baeckchen und Stirn streichen und so etwas Farbe ausheben um Lichtpunkte zu setzen. Ich fahre aber wirklich nur 1x schnell ueber die bestimmten Stellen.
 Voila, das ist es schon fuer's die Hautfarbe. Danke fuer's lesen und nun viel Spass beim ausprobieren.
 Schatten entlang des Haaransatzes lege ich mit einer 2. Schicht Eoo auf. Mir persoenlich gefaellt es nicht mit einer 4 dunkleren Farbe im Gesicht zu malen. Es wirkt meiner Meinung nach unnatuerlich. (Geld gespart fuer eine andere Farbe, weil man wirklich nur 3 Stifte benoetigt)
If you like to lay shadow along the hairline you can do this with almost no pressure to the brush of your E00 color. I personally do not like to do that with a darker color! But this is my personal preference. I rather use the same color and just draw over the area a couple of times, i think it looks the most natural. This also saves you on purchasing an additonal marker.
 Mit E000 die Uebergaenge nochmals leicht ausgleichen. use E000 to blend the color in.
 Letzter Schritt... Mit der Spitze des Blender pen schnell und zuegig zwischen Baeckchen und Stirn streichen und so etwas Farbe ausheben um Lichtpunkte zu setzen. Ich fahre aber wirklich nur 1x schnell ueber die bestimmten Stellen.
Last step to finish up your skin is to use the tip of your Blender pen with no pressure and use it on the indicated area. This will carefully lift some color out and give your face light and dimension. I know it is is tempting, but i really only do this step once :-)
Voila, das ist es schon fuer's die Hautfarbe. Danke fuer's lesen und nun viel Spass beim ausprobieren.
There are many ways to color in images - this is just the way i do it - i hope i could eventually help the ones who are beginning with Copics and the ones who are experienced maybe to give an option to try out.
Thank you so much and i hope you will stay with me for my other Copic postings :-)
NOTE: Iam not a certified Copic Instructor!
77 comments:
Hey Claudia!! Great job on your tutorial!! You explained it so nicely and so easy to understand!! Your coloring of your images are always beautiful and perfect!!
Maria
Wonderful tutorial Claudia!! Can't wait for the others!!
Hugs, K
Another fantastic tutorial Claudia, please keep them coming x
Great tutorial Claudia ,now I just need to purchase some copics,lol .
Great tutorial! Ive never done it before. I dont even own any copics. Some day I will. Thank you so much for sharing.
Liebe Claudia,
ganz lieben Dank für Dein tolles Tutorial, es ist super verständlich.*Knuddels*
This was very informative for me.
Thank you for this wonderful tutorial. I have had copics for some time but don't really know how to use them properly.
Gill x
Great tutorial Claudia, it's always interesting to see how others color with the same medium. Just think, we started this a year ago! :) ~Hugs
Thanks for the tutorial Claudia. :)
Another fabulous tutorial...what a lot of work...thanks, again, for sharing your techniques and favourite colours...your copic colouring is always awesome :-)
Looking forward to your next tutorial!
Hugs
Carole xxx
Vielen vielen Dank Claudia und auch noch in Deutsch! So ist es perfekt für mich.
Fühl dich ganz fest gedrückt von mir!
LG Andrea
Wonderful tutorial! Thank you for taking the time to post this not only in English but also in German. It gives me a chance to see how much German I remember from school (25 years ago).
hugs,
Deana
Thanks for the tutorial! It's a wonderful help.
Wow great Job, i will try some techniques you do... You are wonderful
I only own a few skin colour copics,but don't have the correct inkpad.Great tutorial and easy to understand.Thanks for sharing.
Claudia, thanks for the tutorial. I just bought a bunch of the Copics as a Xmas gift to myself but have been too chicken to color with them yet! They just sit so pretty in their boxes not being used! Your tutorial has given me the courage to try coloring with them this weekend! Thank you for the motivation and instructions1
Oh Claudia, that was FAB!
Very clearly explained and I can't wait to give it a try now as I done it very different, so the tips are very appreciated :)
Can't wait for the next one!!!
hugs, Marlene x
Thank you for providing this tutorial for Copics! I have just found your site, and LOVE it!
Your tutorial is explained so well Claudia, I tried copics but may go back to them later. Thanks for this!
Wow thank you I am going off to have a go now
Thank you xx
Claudia this is a great tutorial! I believe it is going to help me alot even though I don't have copics. It will work with any coloring.TFS
Hugs,connie
Thank You so much for putting this on your blog, I didn't note the date. I've been in the hospital (thank God for laptops and wireless!!) I'm still in & so far behind on my blogging. I have always wanted to try the copics, I may just start out with some of the skin tones and and a few primarys for clothing. Thanks, that was awesome to see how you take the blank canvas and give 'er life. :-)
Claudia thanks for this wonderful tutorial! I will have to give your technique a shot on my next one! you're awesome to take the time to share your knowledge with the rest of us.
Claudia, thank you so much for this and the list of copics and CS you recommend. I don't have any copics but I have still found this useful and interesting.
Claudia
Thank you Thank You soooooooooooo Much for all the work You did on theis Tutorial ..You probally helped a million people , me being one of them ..Cant wait for more
Huggs
diana Molinaro
Fabulous tutorial Claudia...wonderful pics and easy to understand!!....will be watching for the next one!!...Thanks so much for sharing!!..Hugs, Ila
Hi Claudia, thank you for the brilliant tutorial. Kirsten.
Thank you so much for this great tutorial!!! Your coloring is beautiful!!!
This is so adorable you did an awesome job!
thanks
Maggie
Http://cuttlebugchallenge.blogspot.com
Thank you so much for taking the time to do the tutorial! Very helpful!!
Thanks for taking the time to make this tutorial. I was clear and informative and wonderful. Thanks for being the type of person who shares their knowledge.
Thank you for taking your time to produce this tutorial! It is priceless!
thanks for taking the time to make this tutorial..it is extremely helpful. I had to print it out so that I can now attempt to do them much better...thanks for sharing your talents with so many!
Hallo Claudia...
Deine Anleitung ist super! Ich warte schon gespannt auf die noch folgenden...Du machst wunderschöne Karten!
Sandra
Hallo Claudia,
herzlichen Dank für die tolle Erklärung und das in Deutsch!!!!
Alles liebe aus der Schweiz
Monika
Hi Claudia,
Thx for the tutorial. Your the best!
xoxo,
Lori
Hey Claudia...Thank you so much for taking the time to show your tips to people like me. I just sat down in front of my computer with my image, my markers any your informational tips. It was great fun and my Magnolia came out very well,TY, TY, TY, TY and then ty Again :-)
Hugz,
Cheri
Fantastic tutorial Claudia, thank you.
Joanne x
What great directions, i have just started with copics and your info is wonderful, love how you go step by step.
thanks
carolyn
Hallo Claudia, aufgrund Deines Tutorials habe ich mir auch copic Stifte besorgt. Will das jetzt auch mal ausprobieren. Einfach eine tolle Erklärung.
Liebe Grüße
shortyrose
Thank you so much for this. You ahve explaned this so well, that even I can follow,esp with the pencil mark showing which way to do it.
Thanks for your great tutorial! Really help me a lot !
[url=http://www.ile-maurice.com/forum/members/wetter-vorhersage.html][b]wetter dienst[/b][/url]
[url=http://www.ile-maurice.com/forum/members/wetter-vorhersage.html][b]wetter deutschland de[b][/url]
http://chaosgone.blogspot.com/2008/08/germanys-current-top-20-popular-songs.html
http://www.facebook.com/pages/weathercom/298713874092
www.weather.com
Nice brief and this fill someone in on helped me alot in my college assignement. Thanks you for your information.
What a great tutorial. Very useful. Thanks....
Regards,
image coloring
To be a upright benign being is to be enduring a philanthropic of openness to the mankind, an skill to guardianship aleatory things beyond your own control, that can take you to be shattered in hugely outermost circumstances pro which you were not to blame. That says something very important about the condition of the righteous autobiography: that it is based on a trust in the fitful and on a willingness to be exposed; it's based on being more like a weed than like a prize, something kind of tenuous, but whose very special beauty is inseparable from that fragility.
n everyone's life, at some occasion, our inner pep goes out. It is then bust into passion at hand an contend with with another human being. We should all be glad for the duration of those people who rekindle the inner transport
To be a upright charitable being is to procure a amiable of openness to the world, an cleverness to guardianship uncertain things beyond your own manage, that can lead you to be shattered in uncommonly exceptionally circumstances as which you were not to blame. That says something very important relating to the condition of the honest autobiography: that it is based on a conviction in the fitful and on a willingness to be exposed; it's based on being more like a weed than like a treasure, something rather fragile, but whose extremely special beauty is inseparable from that fragility.
dsf
Finding exercises for sciatic nerve pain relief can
be brutal on my way to improve your skeletal structure isdesigned to work for you.
With a facet joint is at risk for experiencing lower nerve pain.
This pain is solely in chiropractic treatment.
As a chiropractor or an infection to or passing bowel movements.
The two points move closer to the grocery store bag will do two sets
of 15 repetitions one to restore some degree.
Also visit my site acupuncture back pain Farmington Hls
Visit my weblog acupuncture back pain Farmington Hls
To hіs сгеdit, Hulk laughed off the ωrеstlіng canvas thiѕ
uρcoming Mondаy night. Hogan's appearance on "Larry King Live"?He won a match against Andre the Giant For their fourth encounter in the spotlight. Every once in a local gym.
Also visit my homepage : consignment shop online
Pretty section of content. I just stumbled upon your blog
and in accession capital to assert that I get actually enjoyed account your blog posts.
Any way I'll be subscribing to your augment and even I achievement you access consistently rapidly.
Feel free to surf my web-site ; daily intake values
The almost plebeian kind of brachial plexus scathe is to
the nerves quad approximately the medial heart, thus reduction the compressing and relieving the neurological Carpal Tunnel.
Adjacent, we own to face at problems seen in a rheumatologist's federal agency is carpal tunnel syndrome CTS.
Here is my web page carpal Tunnel treatment Jet
Feel free to surf my web blog carpal tunnel treatment Jet
Pretty gгеat poѕt. I just stumbled upοn your blog
anԁ wantеd to mention that І've truly loved browsing your blog posts. After all I'll be subscribing in your rss feed and
I hopе you write οnce morе soon!
Also visit my web site ... rippedmusclexsite.com
This is a great tip especially to those fresh to the blogosphere.
Simple but very precise information… Thanks for sharing this one.
A must read post!
My webpage ... smoking cds
If some one wants expert view regarding running a blog afterward i
advise him/her to pay a visit this webpage, Keep up the fastidious job.
Feel free to visit my website ... flash websites
Very nice post. I simply stumbled upon your blog and wished to say that I've truly loved surfing around your blog posts. In any case I'll be subscribing to your rss feed and I
hope you write again soon!
Also visit my web-site beauty products
Usually, a brand new website takes about six
months to one year to appear in the SERPs of Google,
assuming the service provider is worth their salt.
The objective is to arrange your passions as carefully as possible
with your online promotion company. Users normally tend to visit websites
that are at the top of this list as they perceive those to be more relevant to the query.
SEO (search engine optimization) and keyword density are terms that scare many a writer who want to write
for the internet. Organic SEO uses valid and safe techniques to rank your site for its keyword.
The algorithms are not known publicly, but one thing is
certain, is the search engine websites that the information
is relevant to the purpose of the preferred site. Identify your niche audience and be an active member
on the forums and blogs. Second tool for power suite is website auditor.
Online research is required to determine
the packages and SEO Company. For those of us who are using the internet to make
money, we all know that it is absolutely essential to get visitors out to our websites.
Thus, if your charges are overly cheap, this might cause doubts and worries from their mines regarding
the quality of the service they get. The growth management of small business can be accomplished with SEO as an integral part of
your overall Internet marketing strategy. Let us assume that at this point you have 6 keywords.
No - you name some of your images "breast. And, as more and more companies move larger portions of their advertising budgets to internet marketing, there is an even greater demand for their skills. Why. Many organizations try to secure you into extremely lengthy agreements to assurance transaction even if they aren't able to provide outcomes. However with passing time the complexity in this field has increased and performing an SEO task is not a simple thing to do. The website serves as a way for customers to find the business and be able to see what services are offered. ============ More at: Comment "Smartly" & Increase Page Views: Writing Essentials 8.
Have a look at my blog Read the Full Article
The fact thаt Toyota chose to upgrade the exterior ѕtуling, interiοr
qualitу and іnterіor roominess of the reԁesigned 2012 Yaгіѕ hatchbаck
rather than upgraԁing the powегtraіn saуs а lot about how Тoyota viеws the neeԁs of
small car buyers. Intегnal or Εxternal
Sound Mixer "All windows systems come with a internet sound mixer they all differ so you may need to review your manual or online sources to figure out how to enable or use it. This not only allows listeners to listen to their favorite MP3 files along with their SIRIUS radio; it also lets them digitally record their favorite radio songs for instant playback.
Also visit my blog post ... myvideo downloader
If you are using firewall software such as Outpost Firewall Pro, the
paid edition of Online Armor and Kaspersky Internet Security or PURE,
you can take advantage of using their Blocklist feature that will block
connections to known malicious URL and IP addresses.
The objective is to arrange your passions as carefully
as possible with your online promotion company.
You can then take a hard look at the companies that come up for that particular keyword.
Out of those 6 keywords, further reduce the number of keywords.
Is professional search engine marketing the thing that you need.
There are so many good blogs out there, and if you're one of those writers, you definitely know how important it is that your site gets heard through all of the noise. Identify your niche audience and be an active member on the forums and blogs. Having realized that it is practically not possible to combat with SEO Next in terms of services and offerings at this point of time, rivals have started thinking of an easier alternative of being successful in their mission. Isn't that something you and your business should be a
part of. What are the advantages of article submission. Use
SEM experts to recognize duplicate content as part of your website, and act immediately
to have it settled. However, in general, SEO services involve using standard and compliant coding.
Now even that is quickly defining point of Search Engine Optimization (SEO) can lead to
intense discussions about the meaning and purpose of
SEO. Here you will need an SEO agency such as Webfirm to try
and run damage limitation. Learn from other people's mistakes and experiences rather than destroying your own skills and wasting your time on experiments. A well-formed internal linking structure and good sitemap can ensure all pages of a website being indexed by a search engine. The World Wide Web is an incredible source of customers and potential revenue for all types of businesses and companies in all niches. You will not even get to a 1 or 2 until Google has fully crawled your website or blog enough to give it a ranking. They are looking up the the keywords you did research on to find what they are looking for. SEO requires understanding of various algorithms.
Have a look at my blog; status-selebritis.com
Thanks on your marvelous posting! I quite enjoyed reading it,
you might be a great author.I will be sure to bookmark your blog and will
come back at some point. I want to encourage that you continue your great work, have a nice weekend!
my web blog youtube converter
Wrіtе mοre, thats all I have to say.
Litегally, it seеms as thοugh you rеlied on the videо to makе your point.
You clеarly know ωhat yourе talking abоut,
why waste уour intelligenсe on just posting videos to your site ωhen you cοulԁ be givіng
us ѕomething infoгmatіve to read?
Alѕo viѕit my weblog www.straube.org
My page: russische Musik
When looking at at cholesterol and pork, it's and cholesterol letting down' may solution in dashing hopes.
mettle disease is static the primary eat smaller portions or reduced-fat versions Spell adding more low-fat alimentary
foods to your diet. One of the Best slipway to a typical can of Chili with
beans besides contains 13g fat.
Feel free to surf to my web site; for treatment guidelines management cholesterol
What I didn't know was how I would get all of what I wanted in just six hours. Many people will be happy with replaceable batteries for home use and occasional outings. In much the same way, two-way radio rental offers businesses and individuals substantial savings in money, time and resources that equipment ownership never will.
Here is my homepage; visit the next site
As we all know, looks can be deceiving, so I decided to
try out the question tool for myself. ''. You can then take a hard
look at the companies that come up for that particular keyword.
This will not only help you find the best service provider but will help you build an idea about the recent SEO
market. NOW, I don't mean you should just put keyword spam in your footer. The major preference is for offshore SEO companies as they offer SEO at the most competitive prices. Instead, the developer should concentrate on the functions mentioned in this article first, as they are the basis for further extension of the Word - Press header file. This means that they follow only the steps given to them by Google and other major search engines. It focuses on networking and impeccable website maintenance. Most of the XML sitemap generators online are simple enough for anyone to use. So, most move slowly when deciding on who becomes the company's SEO.
The growth management of small business can be accomplished with SEO as an integral part of your overall Internet marketing strategy.
Let us assume that at this point you have 6 keywords.
You can Google maps link for your website, which will be very helpful if any person search in images sections.
And, as more and more companies move larger portions of their advertising budgets
to internet marketing, there is an even greater demand for
their skills. Originally posted at: digitalmoz. Many organizations
try to secure you into extremely lengthy agreements to assurance transaction even
if they aren't able to provide outcomes. Keep in mind that Google doesn’t really like page rank manipulation, even if it’s internally on your site or externally by backlink spamming. You need the keyword and phrase in both title and description. SEO requires understanding of various algorithms.
my web page: businessprofessionals.eu
Ϲonsider running а contest oг offering
a freе product tip shеet thаt accomрanies the intervieω.
Yet anothеr wаy to construct a dеvіce to harnesѕ energy from radio waveѕ
is using an antenna, connected to a series
οf diodes аnd a сapacitor bаnk that iѕ earthеd.
Thіs not оnly allows liѕteners to listen to thеir favoritе MP3 files alоng
with their SIRIUS гadio; it alѕo lets thеm digitally
record their favoгite raԁio songs
fоr inѕtant playback.
Alsο visit mу web site - online radio
Truly when someone doesn't know after that its up to other visitors that they will assist, so here it takes place.
Also visit my website; fiber supplements especially
Parkinson's disease is caused how to do it right, which is hopeful for future clinical use." In near cases, patients would be provided with an IV dribble class: this compares with a third of the general community of interests-based aged universe who know falls. A booster of Wally's lives on his own with PD.
He enjoys demonstrating how he rocks his consistency been showing Bully benefits for Parkinson's sufferers. That was exciting until Dr. Greengard of us can yield that proper now.
Feel free to visit my blog Parkinson's disease specialists Ft
Huachuca
My web site > Parkinson's disease specialists Ft Huachuca
Hey there! This is my first visit to your blog!
We are a collection of volunteers and starting a new project in a community in the
same niche. Your blog provided us valuable information
to work on. You have done a extraordinary job!
Also visit my web site - money online
You can аlso buy bundlе deals, which most radio ѕtatіonѕ offer, to decrease thе ovеrall ad сoѕt.
The lіne сomes off the bοat autоmatically оnсe іt hitѕ a fish, whiсh meаnѕ that the
usеr can саtch a fish of virtuallу any size.
Even todaу, I go big gamе hunting anԁ all thiѕ,
and thе more ԁangerous somеthing іs,
thе hаρρier I am.
Τaκe a look at my blog post: simply click the following post
I am really happy to glance at this web site posts which contains tons of helpful data, thanks for providing these statistics.
Here is my web-site: http://dave.icy.com.au/
Ӏ am гegular visitoг, how аrе уou eѵerybodу?
Thіs artiсlе posted at thiѕ site is actuаlly nice.
Look аt mу weblog: video downloader
Essentially, it is usually drastically more affordable in the event you exchange the actual battery oneself, as opposed to
finding a storage area to get it done. Hold your device
on end to locate two small screws on either side of the
dock. Mobile computing is continuously getting better with best
performance, smarter processors, light weight and handy designs, but as we all
know, the main power of the mobile computing device (weather it is laptop, mobile, PDA or e-book reader)
resides in it's battery capacity.
Here is my weblog; visit the up coming website - foolsandheroes.org
Sound quality won't be much better than an industrial FM station, and it is often worse. Yes, the present administrators of the odyssey streaming radio LLC have worked hard to launch excellent radio entertainment programs. Not only for the business users but this dedicated seedbox is very useful for even personal users.
Here is my web-site :: click through the following post
Also see my site - just click the up coming website
Post a Comment