
The airbrushing is really really easy and gives you a nice and professional look of your backgrounds. Since i use this on my cards i never mask my images anymore. I either start like shown here or i stamp the image first and carefully brush around the image.
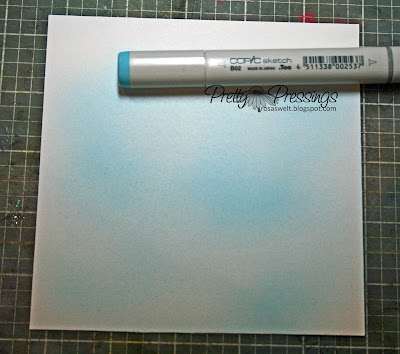
My card is going to be a winter card and i picked a blue for the sky that matched my patterned paper B02. Insert your Copic Sketch marker like seen in the picture into the gun. You can not use the Airbrush System with Copic Ciao makers!
 Next, i start pushing the trigger all the way down and start out holding the gun fairly wide off the paper. Once i see how the color appears on my CS i hold the gun as close to the paper you see on the picture. If you do not push the trigger in a constant position you will get splatters and uneven color on your paper. (the splatters can be a nice effect too especially if you airbrush your flowers! ... i have done that before too... i buy white Prima flowers (see an example on my Sarah Kay card here) and airbrush them into the color i need them to be)
 On my "finished" piece of airbrushed paper i don't care at the moment that some spots are a bit
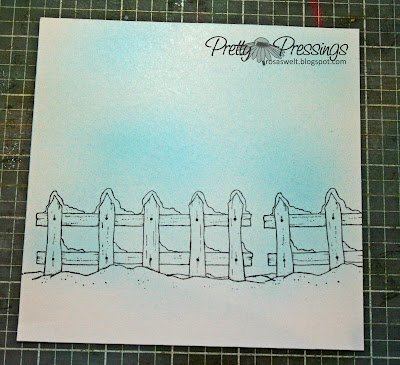
darker than others, because i know where i will add my images. I left on purpose the bottom part white, that's where my "snow" will be.
 Now, i stamp with my stamp my image right onto the blue airbrushed cs
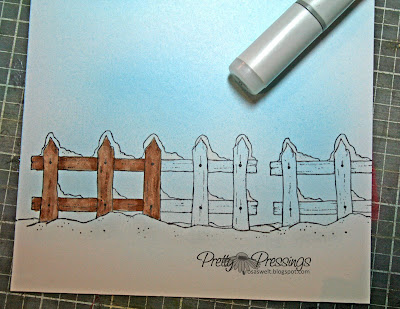
 Using a dark brown color will hide completely the blue and you will not see it later on your card even if you hold the card in your hands. (at this point i added 2 shades of browns not yet blended) I lift with my Copic blender pen the blue out where the snow is on the fence.
 That's it.. on the bottom part of the card i added snow using Dazzeling Diamond Dust but you could also use Liquid Applique or just use your blender pen and color the ground green (for grass of course :-) Really fast and simple.
 Now, i stamp with my stamp my image right onto the blue airbrushed cs
 Using a dark brown color will hide completely the blue and you will not see it later on your card even if you hold the card in your hands. (at this point i added 2 shades of browns not yet blended) I lift with my Copic blender pen the blue out where the snow is on the fence.
 That's it.. on the bottom part of the card i added snow using Dazzeling Diamond Dust but you could also use Liquid Applique or just use your blender pen and color the ground green (for grass of course :-) Really fast and simple.
13 comments:
What a great tutorial Claudia, it's thanks to you that I now have copics and this great airbrush system...I love airbrushing! Thanks for sharing your tips!
Have a great Sunday.
Hugs
Carole x
ps...just noticed the picture of you and Niklas...so sweet...nice to 'see' you too :-)
What great photos of the system! I love mine, and used it a ton with the air cans... I then a few weeks ago purchased a compressor. It will be going back this week, I went cheaper and got the smaller PSI... wrong - doesn't have enough air - so tomorrow I will take it back and spend the extra $ and get the better machine - I miss it and hope to be back spraying soon!
HUGS
MichelleO
Claudia thank you so very much for the air brush tutorial! That is awesome, I always wondered how that worked! I know see this is going to have to be added to my wish list! :)
Happy Sunday!
Hugs~ Kim
wow, thanks for that tutorial
Great tutorial, I always wondered what air brushing was and how to do it, thanks.
Wow Claudia this tutorial is very helpful, just need to get myself some more copics and the compressor! hugs Linda x
Wow this is so great - I need to put this on my whish list for christmas. Why cant anyone sell this markers and the system in Norway???
Thank you for the turiotal my friend
Cant wait to see the finish card
Hugs and love
Heidi
This is great, maybe I should ask for this for Christmas. I am just not 100% sure how much I will use claudia. This is a simple tutorial and thanks for posting.
Thanks for showing how airbrushing works. I kind of knew. This is better.
It is unfortunate that we now have folks not ever browsing over this web site. Best wishes
Outstanding data. We've undoubtedly realized new things today! Thank you.
Whoa this blog ended up being wonderful. Excellent job and/and also keep up the good work. Thanks a lot for the post it works well for me personally
Thanks for offering these kinds of really helpful information. Congrats upon becoming an exceptional blogger.
Post a Comment