 All supplies for this card can be found at Magnolias online store. Except the patterend paper. I do not remember the name of this DP, i used up some scraps.
I had recently many questions regarding the Copic markers. I would like to show you how "I" start to color but i would like to stress that iam not certified and have no training. Many of the stampers here in the US take special Copic classes, on how to use these high end markers. So i do not know if this is all right on how i color. I think a good sorce to learn on how these markers can be used is also over at my Magnolia Design Team mate. She does an outstanding job with these markers.
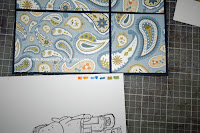
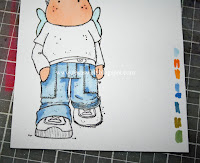
Okay here it goes... i did not upload these pics very big but you can click on them and see the details. First i pick my markers to match my DP
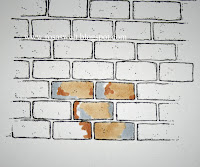
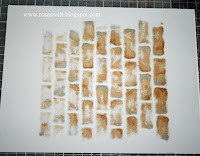
 I wanted to show you how great you can shade with these markers so i used greys and bowns to color my wall.
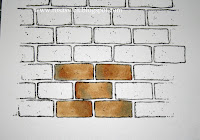
 I used the lightest brown color E31 to just blend over all the colors
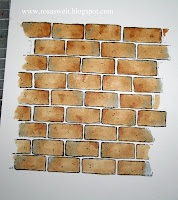

36 comments:
WOW!!! Claudia, your coloring is amazing...doesn't matter to me if you're certified or not, you sure know what to do with them!! I'll be coming to you for help!! Have a wonderful weekend:-)
Wow!! This is great Claudia, your colouring is fabulous!! Thanks for the kind words too!!! But I'll certainly take lessons from YOU!!
Great coloring tutorial Claudia...and I love your cute card!
A great card, thanks for the tutorial, Ive bought a load of Copics this week!!!!
Clairexx
Hallo Claudi,
die Coloration ist der Hammer, wunder-wunderschön.
Ein tolles Tutorial, danke dafür.
Liebe Grüße, Claudia
Claudia your instructions are wondeful. Those Bricks are FABULOUS!!! I have them on the way to me.. I hope! They were in my order last week. Your card is great and your work is beautiful as always!
Hallo Claudia,
ich bin ja wiedermal begeistert. So eine super Karte.
Und danke auch für die tolle Anleitung.
LG Jutta
Wieder eine wunderschöne Karte und das Tutorial ist super. All die schönen Extras und das Stitching gefallen mir sehr!
I think your coloring is fantasic.
The brickwall is the best i have seen in along time.
And i love your blog because it´s a great inspiration source.
eva
from sweden
Great Card! and thanks for this tut!
This is fantastic, your coloring is awesome, thanks for sharing your technique.
wow die ist ja wieder total cool .. .richtig was für deine jungs!!! das tutorial is klasse und von der machart nicht nur für die copics ..
lg
bea
Wow, beautiful card again with great coloring!! Thank you for the tutorial, because I was thinking of buying Copics.
Wow super cool. Wunderschön coloriert, ein Traum.
love your card dear, you make the coloring look so easy. thanks for the how too
Love your card - and i love your coloring. WOW it is so great! You are so talented.
Hugs from
heidi
Thank for this tutorial Claudia. I will refer back to it when my copics arrived. The card is brilliant and the brick wall looks fantastic. Hugs, Nikki x
Hi Claudia, what a wonderful card, and thank you very much for the step by step tutorial, have a great weekend :) x
Danke Dir, liebe Claudia - ich hab die Stifte hier noch nie gesehen, aber die Ergebnisse, die Du damit erzielst (mal ab davon, dass Du auch mit anderen Stiften grandios colorierst), sind einfach nur genial - vielen lieben Dank für die tolle Erklärung - bist ein Schatz !!! xox
You are simply Fatastic Claudia...
Your card is gorgoeous:)x
Those bricks are so real looking, awesome coloring! Too cute!
Wauw great card your coloring is fantastic!!
LG Agnes
This is fabulous, Claudia! Where can I buy these copic markers?
Hanne:)
Really Great colouring ! Where do you by this copics pens. Thanks in advance for your answer.
Hugs
Karin
Could you also tell me which quality of copics you use ?
Thanks very much in advance for your answer.
Hugs
Karin
Gorgeous card Claudia and fab colouring. I love these stamps, he looks so cool. What are 'kaefers'?
you make it look so easy Claudia! love the way you coloured the wall and a fab DT card.
Awesome card... and fantastic colors. Thanks for the tutorial... it was great to see the base colors. TFS!
Fabulous card Claudia, love this, thanks for another fab tutorial, I just finished my tri fold pocket card, they are fab to make!
Gorgeous Card!! Your coloring is Fantastic and what a great tutorial!! I love the way you colored the brick wall!!
Wow, fab card and thanks so much for the brilliant tutorial, very helpful.
Your Copic marker technique is flawless Claudia...it is a great tutorial...very clear instructions...I will definitely try to put your pointers into practice.
Thanks for sharing your know-how!!!
Tara
Thanks for the amazing copic tutorial. After much deliberation mine are 'in trasnit' as we speak. After reading your tutorial I should have a head start on getting to grips with them. Many Thanks! Daffodil
Hello, thank you very much for sharing this technique does not like to know, now I try.
Me if I could help with other models to be practicing
greetings
ELSA
Nice fill someone in on and this enter helped me alot in my college assignement. Gratefulness you seeking your information.
Easily I assent to but I about the brief should have more info then it has.
Post a Comment