Thursday, December 30, 2010

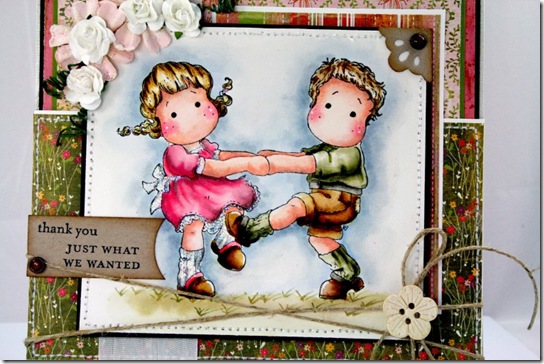
Thank you – Just What We Wanted

Hello, thank you for all your sweet comments! I have not been feeling so great – my kids and i have since beginning of December a cough, which turns out to be Bronchitis. I have enjoyed the past days – staying longer in bed and hop to your blogs! Must say i have missed that! 

Claudia_Rosa_Just_what_We_Wanted


So, now i am thinking what i can tell you about my card :-) First off.. it is water colored. Yes, right :-) this card was a order from one of my readers and she asked me if i would water color again. Lucky me, she really likes the card and I will post the card on Saturday to Germany. Thank you :-)

I think the last time i pulled my box out with the ink bottles was in early August. I just do not feel secure with this element.

What i like about this card is the paper with the image – it was picked by my husband :-) I wished i could color such nice flowers to the ground, so it would look even more like Tilda and Edwin are dancing for joy in a flower field. Well.. i have tried with patterned paper :-)
The card is for Cute Card Thursdays Challenge this week – were we would love to see your “thank you” cards. I bet Santa was good to all of you – and you are going to need a bunch :-)

 Claudia_Rosa_Just_what_We_Wanted_1

Stamps: Tilda & Edwin dancing through Sir Stampalot while you are over at Sir Stampalot… don’t forget to check out the store’s first SUPER STAMP SALE

Sentiment: Stampin up
Papers: 6x6 Basic Grey “Green At Heart” one of those pads i did not like at first and now i can use them all the time :-)
Embellishments: Flowers all by Prima Sir Stampalot has a great selection, string (Stampin up) fake button (Joanns), Basic Grey epoxy brads, Stickles in Star Dust
Dies: Quickutz
Watercolors: Vintage Photo, Walnut Stain, Stampin up: Mellow Moss, Pretty In Pink, Blush Blossom, Barely Banana, Going Grey, Brocade Blue,

That’s it i think… please come back tomorrow.. i have some exciting news for you to share about “Just Magnolia” :-) I am sure you will like it!

Tuesday, December 28, 2010

Sending You Birthday Wishes ~ Sneak Peek

Hello my friends, thanks for taking time to swing by. Today i have more photos than usually… probably because i am not making those Easel cards many times. This one is my second attempt.

Claudia_Rosa_Cicular_2
The first picture shows you one of the nice script sentiments i got from my friend Crissy for Christmas. I looove it – it is made by Stempelglede in Norway.
 

Claudia_Rosa_Cicular_1

I used Mojo Monday’s sketch # 171 circular shape sketch. There is one for square cards as well up.

Claudia_Rosa_Calendar_5

Lili of the Valley “Birthday Fairy” remember all those cute stamps can be ordered after Lili of the Valley’s holiday break on January 4!

Don’t miss to enter my Lili of the Valley blog candy while you are here.. you could win 2 stamps by entering, following me and mentioning it on your blog!

Claudia_Rosa_Calendar_4

Colored with Copic Sketch with the following pens: R 0000/ 01/ 12/ 22/ 20/ Y23
E/ 20/ 00/ 11/ 0000/ 93/ 40/ 42/50/ 43/ 44/ 29/ 27/ 25/ 21/ 34/ 31/ 21/ 41
C00/ 03/ 2/ W 10/ 6/ 4/ 5/ 3/ 10/

The card is 6x6 sized, i was able to make this card with the new Grand Calibur (gift from my friend Jacque for Christmas :-) and and Spellbinders Grand Circles, Spellbinder square and large scalloped square & ovals

Sentiment in front is by Stampin up
Paper is by Basic Grey “Olivia”
All supplies as Copics, Spellbinder sets and Grand Calibur are available through Cute Stamps and Cards!

Monday, December 27, 2010

Little Gift Ideas

Hi there… thanks for visiting me today.

Finally i can show you two little calendars i have made a few weeks back. The idea is completely taken from my very talented German friend Monika. She sent me in 2009 and 2010 each year one of these. The only thing she did was, to adhere the calendar sheets to the front (like were you can see my teddy) so it could sit like this through out the year on my desk.

Claudia_Rosa_Calendar_1

I thought that those tiny CD jewel cases would also make a great storage space or case to give some dies to friends.

Here i just placed a few of my Magnolia Doo Hickey dies – so you get an idea of the size. They do fit nicely, don’t they? Sweet little gift idea for a crafting friend.

Claudia_Rosa_Calendar_3


It was fairly difficult to take good photos of the holder – maybe this photo shows better how the idea works. I covered the backside of the magnetic sheet with matching Designer paper. The calendar is just with Scott double sided tape adhered, so the focal point image can be easily exchanged for Spring or Summer if my friend likes to keep this holder.

Claudia_Rosa_Calendar_2

 For the supplies:
Teddy on sled – Lili of the Valley
Snowman – Lili of the Valley

Sentiments: Whimsy Postmark stamps
Papers: Basic Grey
Dies: Marianne Design and Martha Stewart Snowflake punch, Magnolia DooHickey dies on Magnet sheets – iam using the full sheets to store all my Nestabilities on them. They are easy to cut to any size you need them.
Coloring: Copic Sketch
Aging/sponging: Vintage Photo
Magnet Sheets, little calendars, CD holders – source unknown Moni can not remember where she purchased them.

PS. Make sure to check out Sir Stampalot first year of a Mega Sale on stamps.

Sunday, December 26, 2010

No Stamping – but yummy

Hello .. i hope you had a fantastic Christmas… we are about to go out and dive into the masses of people heading to Macy’s to take advantage of the Day after Christmas sales. I want to get some new Christmas ornaments for our tree. Time to get some nice things, since the kids are now in a age that i do not have to worry they would break the ornaments and get hurt.

However i would love to share a link with you if you want to make something homemade to bring to your friend. My family (not me) loves marshmallows… they like them in hot chocolate and as a treat. The other day i came across a stampers blog by accident and saw that she made some herself and followed her link – and they are sooo easy to make, plus the kitchen is not a big mess like you have when making home made sugar cookies.
Marshmellows_1

I have made two kinds.. the ones you see in the photo are Vanilla kinds drizzled with dipping milk chocolate for the kids and for adults i made Candy cane ones – no photos of those.. i tell you.. they went fast.. one of my friends came actually back to my house telling me how much she liked them and i gave her an other bag :-) What you do is add crushed candy canes in the bottom of your glass dish and add into the mixture about 1/2 spoon Peppermint extract…. add half of the mixture over the crushed Candy cane, dripple some red food coloring in, swirl add rest of mixture on top and again a few red food coloring.. just like you would do it with a marble cake.
They turned out really nice and different than store bought.
Well… i see you tomorrow with a new card. 
Marshmellows
ps.. i do not have a candy thermometer – just boil your liquid (cornstarch with sugar mixture) once it starts boiling really hard for 1 minute and you are good.